While Word’s image placement might seem impenetrable and cryptic, there are in fact rules. But in order to use images in Microsoft Word of macOS without pulling your hair out, you need to know how to use some advanced options that aren’t as obvious or easy to use as they should be.
Why Is Word So Bad with Images?
If you ask Microsoft, they’ll say it’s because people don’t understand how Word works with images. They’re not wrong: that is the problem. It’s just that it’s entirely Microsoft’s fault.
The tools for moving images are unintuitive and hard to find, so folks typically never get past their first disastrous brush with image placement. They write off Word as being “bad with pictures” and mentally consign it to the eternal graveyard of disappointing software.
But this is unjust! Despite its reputation, Word actually has excellent image management tools. Much like formatting text properly in Word, if you learn the basic functionality of images in Microsoft Word, you can place images in Word with no frustration or angst. Sounds like a fantasy? Read on.
Setting Up For Images in Microsoft Word
The first think you need to learn is how Word actually deals with images. If you don’t change default settings, images in Microsoft Word will be treated like giant letters. That immediately gets people off on the wrong foot, and they start fidgeting with settings they don’t understand, hoping the image will miraculously snap into place. I know from long and painful experience.
Let’s get those settings fixed before we drop a single image in our document.
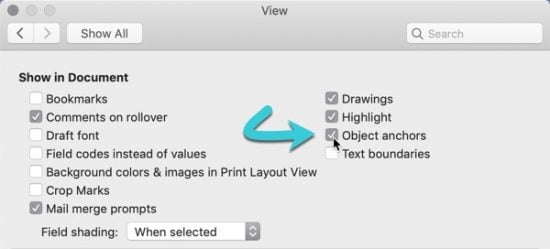
1. First, we must make anchor points visible. Anchor points tell you where your image is located in terms of document construction. Without anchors, you’ll be mystified by nonsensical imagine movements.
To reveal anchor icons, navigate to Word Preferences > View, and in the Show in Documents of the window, check the box next to Object anchors. If it’s already checked, leave it that way.
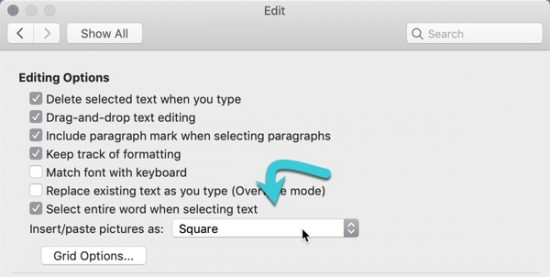
2. Text wrapping also causes no end of trouble. By default, images are placed in-line with text, but that’s rarely what you actually want. We can fix that by changing our default text wrapping.
Navigate to Word Preferences > Edit > Editing Options, and change the drop-down next to Insert/paste pictures as: to Square.
3. As with anchors, we need to see information about how our document is constructed. To accomplish that, we need to turn on non-printing characters, commonly known as “backwards P” (¶). Like anchors, these symbols are hidden by default, but they’re essential when working with layouts in Word. Click on the “backwards P” (technically called a “pilcrow”) to reveal non-printing characters.
![]()
Here’s a pro tip: if the blue dots on spaces annoy you, they can be disabled in Word’s Preferences under View.
Image Anchors
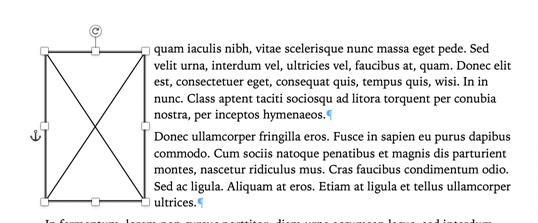
The simplest way to get images into Word is generally by dragging them into the document. When you do, take note of the black cursor. The image will appear as close to that cursor as your formatting options and document layout allows.

Once you drop the image into the document, you’ll see an anchor appear near by. Depending on exactly where you dragged your image in your document, the anchor location and image placement will be slightly different.
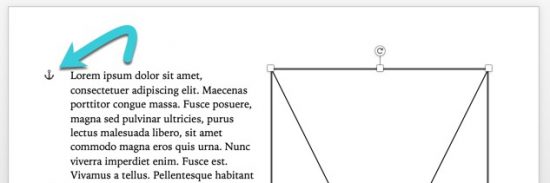
This anchor tell us that the image it attached to the top paragraph on the page. And I do mean “attached”: it will follow the paragraph around until the anchor is changed or attached to another element of the document. Use this as a guide to help you understand how your formatting changes will affect your image placement.
Managing Image Positioning
Most of the time, when we drag and drop an image into a document, it doesn’t go where we hoped it would. That’s where the formatting pane comes into play.
1. Select the image in your document by single-clicking it. You’ll see a black border and resize handles appear around the edges of the image when it is selected.
2. Right-click on the image and choose Position and Size from the contextual menu.
3. Click on the Position tab in the pop-up window.
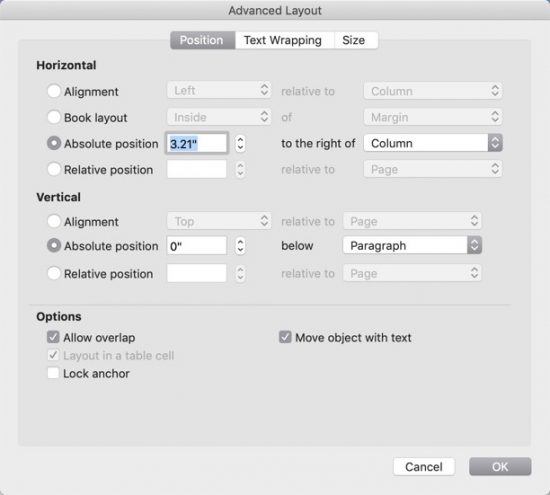
We can see here that the selected image is set to Absolute position to the right of column. But what on earth does that mean?
Working With Images in Microsoft Word the Right Way
This tells us that the top left corner of the image is placed the specified measurement away from the column. In this case, the column is the same as the margin, representing the edge of the text. So to determine the image’s placement, Word starts at the margin/column edge in the anchored paragraph. Then, it adds (or subtracts) the provided measurements to arrive at the images position on the page. It is basic coordinate geometry in a Cartesian plane, if you remember your high school mathematics.
It’s possible to align images in Microsoft Word to different features of the document, like Page and Paragraph. Depending on your layout, you may one day want to do that. For one-column Word documents, the defaults settings are the best.
By adjusting these measurements, we can control the image’s placement. In this case, I want to align a renegade image with the body of my text, as the arrow indicates. Right now, it’s to the left of the page margin for some unknowable reason which is not at all related to user error.
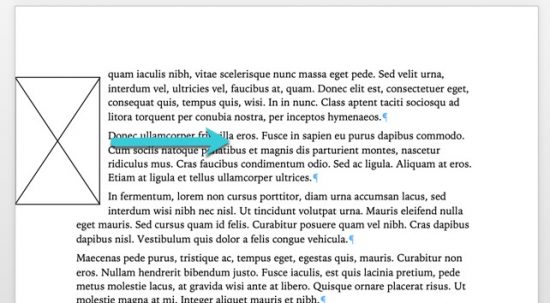
When I open the Advanced Layout pane, I see a negative horizontal measurement. This means that, starting at the margin/column edge, Word is subtracting that measurement and placing the image’s upper left corner at the derived coordinate. Rather than moving to the right of the margin, the image moves to the left, as our screenshot shows.
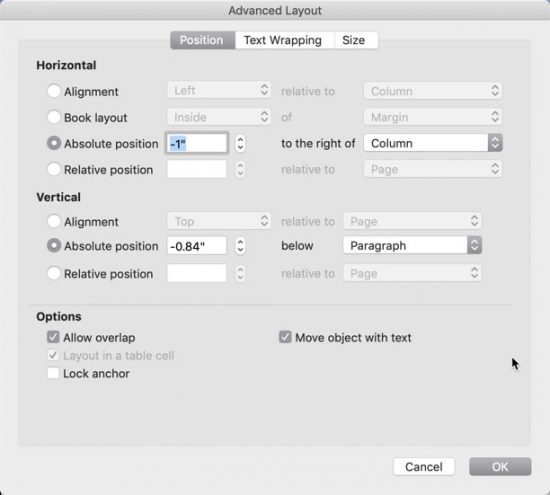
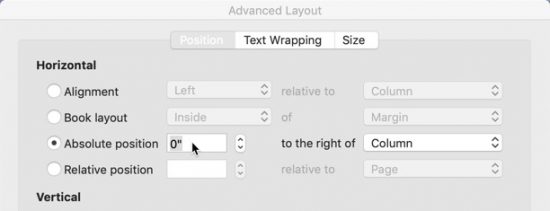
This is an easy problem to fix. Change that to a 0. Word will then add zero inches to the column, plopping the image right on the margin.
Other Important Options
There are also additional options at the bottom of the Advanced Formatting pane.
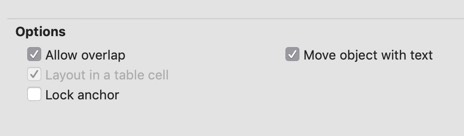
Move object with text allows the anchor to move with the paragraph it’s attached to. If the paragraph moves, the image moves with it. If you want the image to stay stuck to the text, keep this checked. If you want to keep the image in the same place on the page, uncheck this box and also check Lock anchor.
Lock Anchor holds the image’s anchor point in its present position. This glues an imagine to its current position. The anchor is placed relative to the page it’s on, rather than the text. As a result, the image stays put, since the page is an immutable, unchangeable construct within Word.
Getting Fancy
There are a few other options you should be aware of for aligning images. The first is the Alignment image placement tool. In the Position tab of the Advanced Formatting window, the first option in the list of Alignment. This sets the image’s placement in the same way you would align text: left, right, or center. It’s great for centering images and lining it up with text. In fact, it’s sometimes a better tool for that than absolute positioning. Pro tip: If you have strange problems with centering, your margins may be uneven. In that case, center in relationship to the page rather than the margin.
Relative position will place the images based on the size of other objects. It works on percentages. Choosing to align an image to 10-percent of the margin would determine the page’s width, take 10 percent of that width, and set the image’s positioning using those measurements.
We haven’t mentioned vertical alignment at all, but it typically doesn’t need adjustment. If you do need to tweak it, the settings work the same way as the horizontal alignment, just flipped 90 degrees. Remember that the anchor point will be as the zero point, or origin, of the image’s placement.
Text Wrapping
The text wrapping tab deals with the interaction between the text and the image rather than the image’s positioning. Square is the best default choice, since most users expect that wrapping. Other options, like Top and Bottom, are helpful for centering an image on a page with text above and below. Experiment with your options to see what’s what.
The settings below the text wrapping presets let you set specific padding measurements. These measurements define how much white space will be used around an image, setting a buffer of unused space between images and text. This is typically desirable, so Word automatically includes this padding on the left and right of the image. If you want to add padding to the top and bottom, change the measurements in these fields.
You might also like the following posts:
Pro Terminal Commands: Copy Colored Code into Word


2 thoughts on “The Dark Art of Working With Images in Microsoft Word”
probably useful if the version used bore any resemblance to mine.
If only this were true:
Right-click on the image and choose Position and Size from the contextual menu.
sorry – no such menu
Hi – Thanks for this post! You don’t know how helpful… (actually, I’m sure you do!)
The article shows the Advanced Layout pop-up dialog, and describes using the Position and Size tabs. But the elephant in the living room is the Text Wrapping tab, which seems to be broken. None of the little thumbnails that represent the various word wrapping options are clickable.
Is this a feature (can’t imagine how), a bug (much more likely), and is there a work-around? I just re-enrolled in Microsoft usability testing… Redmond is a 20 mile drive. Maybe somebody there will listen…