
Markup is one of the more under utilized features of OS X Yosemite. So much so, that many users don’t even know that it even exists. The Markup functionality exists within the OS X Mail app, allowing you to make simple edits and annotations to image files and PDF documents that are sent your way as attachments. The toolset is fairly simple to use, and once you get a grasp of how things operate, they can save you time and make you more productive. Here’s how it works.
Activate Markup
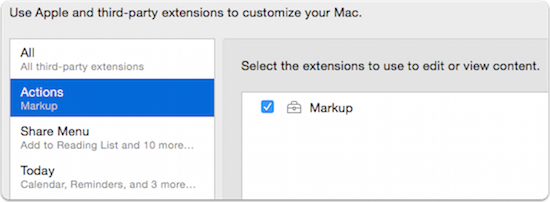
The Markup functionality should be turned on be default, but before you start using it you should check to make sure that is the case. Click on the Apple Menu and select System Preferences. Next, choose the Extensions menu, and click on the option labeled “Actions.” You should be presented with a checkbox that says “Markup.” Be sure the box is checked before proceeding.
Hidden in Your Email
As mentioned, the Markup tools are found in the Mail app for OS X, although you won’t find any kind of menu item that indicates where they are located. To access these tools you’ll need to either be composing a new message or replying to one that you’ve already received. That message must also have either a photo or PDF file attached to it as well.
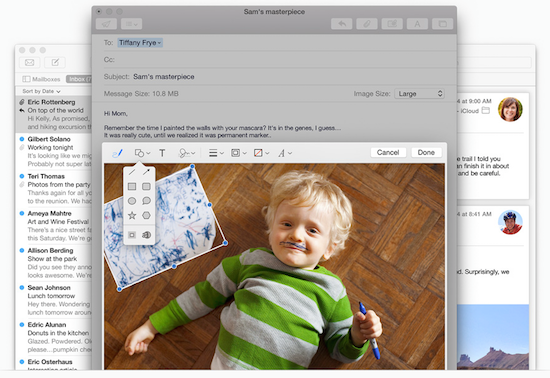
To activate the Markup tools, mouse over the attached file and look for a small icon to appear in the upper right corner. Click on that icon to open a menu, and choose the option that is labeled “Markup.” This will then launch a new window in Mail that displays the email message and attachment with the Markup toolbar activated along the top.
Markup Tools
One the toolbar is activated you’ll see a number of options to choose from. They include the following:
- Sketch: The Sketch tool allows you to draw free-form marks and shapes on an image or PDF file. If those shapes are recognized as being something standard – say a circle or triangle – the software will attempt to convert it to that shape automatically.
- Shapes: This tool allows you to choose from a selection of preexisting shapes, and place them anywhere on the file. Simply drag and drop to get them into place. Resize those shapes by clicking on it and dragging the blue handles. Alternatively, you can skew the look of the shape by clicking and dragging the green handles. There is also a loupe and highlight tool as well, which can really help to make specific items to stand out.
- Text: Places a text box anywhere on the image or PDF file which users can then type notes into.
- Sign: Allows you to automatically add your signature to a form. If it is the first time using this feature, you’ll first be prompted to create a digital signature by using your mouse or trackpad. If the signature already exists Markup will place it into the file for you.
- Shape Style: This menu allows you to define the characteristics of the shapes that you place using the Markup tools. Options includes the line width, amount of shadow or the appearance of arrows.
- Border Color: A quick and easy way to adjust the color of the border of the shapes that you place on the file.
- Fill Color: This options allows you to define the color of the interior of the shape that you’ve placed. So, if you create a square with a black border, you can have the shape filled with an entirely different color if you choose.
- Text Style: As you would expect, this menu lets the user adjust the style of font, as well as its size, color, and alignment, that is used in any text that you place on the document.
Markup the File
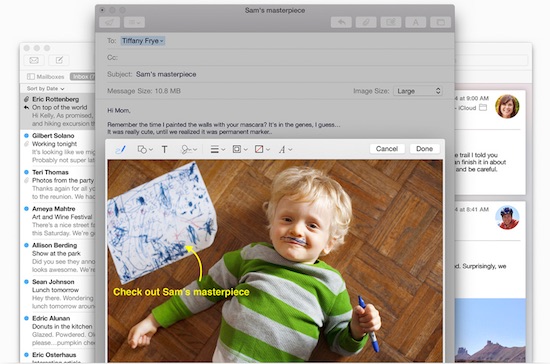
With the toolbar activated, and an understanding of what each of the tools is capable of, you are free to use them as needed on the image or PDF file. For instance, you can use the Text tool to place a note over an area that requires edited, while circling the particular area with the Sketch or Shape tool. Need to drop your signature into a PDF form, that’s no problem with the Signature tool of course.
The purpose of Markup is to allow Mail users to make slight changes and adjustments to images and PDFs without ever having to exit the program or access another piece of software. In other words, it is possible to leave comments and point out items that need to be adjusted in a quick and easy fashion. When used in this way Markup succeeds wonderfully.
While none of the Markup tools are especially difficult to use, they can be a bit finicky at times. Using this feature of OS X require a little practice, as sometimes it can be a bit quirky. But once you get the hang of it, Markup can become a very useful productivity tool.
Crop Your Image Too
Markup has another tool that can be rather useful, although it isn’t all that evident at first. With the Markup toolbar activated you can hover your cursor over the edge of an image and blue grab handles will appear. This will allow you to quickly and efficiently crop an image down in size without needing to save the file to your computer and open it in another piece of software. This is again a very handy feature to have at your disposal.
Sharing Your Markups
Once you’ve finished marking-up the file, it is ready to be sent to the recipient of the email. It will arrive in their inbox with all of the adjustments you have made saved in place. Those adjustments are not reversible however, so any shapes, text boxes, signatures, or arrows that you have added will be there permanently. This isn’t generally an issue, but make sure the original attached file is safely backed up elsewhere.
Any Markup files can also be saved outside of the Mail app as well, which means that you can use the toolset as a simple photo editor when you need one, although it is a bit ponderous to do so when not just making adjustments to an email attachment.
Hopefully this article gives you a better understanding of what Markup in OS X is all about, and how it can be used to make quick edits and annotations to attachments in emails. With a little practice, you’ll see how simple it truly is, and how it make you more productive too.
Also Read:
5 Great Features of OS X Yosemite No One is Using
5 New Features of OS X Yosemite That Will Help You Be More Productive


