

AirDrop has been a feature of the Mac operating system since the release of OS X Lion back in 2011. It is a service that enables quick and easy file sharing between computers on the same network without the need of email or a file server. As OS X has continued to evolve, AirDrop has gotten faster and more robust, making it a truly useful way to transfer documents, photos, music, or just about anything else you might need to share. When Apple released iOS 7 last year, it introduced a version of the service for mobile devices as well, giving iPhones and iPads with supported hardware the ability to send files to one another just as easily. Until recently, the iOS version of Airdrop worked on a different set of protocols than OS X however, which prevented it from working between iPhones and Macs. That chagned with the release of iOS 8 and OS X Yosemite however, and now the service works between all Apple devices. Here’s how to use AirDrop to share files between your iPhone, iPad, and Mac.
AirDrop Compatible Hardware
While AirDrop is a part of iOS and OS X, not all hardware supports the service. It only works on the iPhone 5 or newer, as well as the 4th generation iPad or newer, including the iPad Mini. The 5th generation iPod Touch also supports AirDrop as well. The Mac hardware that is AirDrop compatible includes the following computers: Macbook Pro (late 2008 or newer), MacBook Air (late 2010 or newer), MacBook (late 2008 or newer), iMac (early 2009 or newer), Mac Mini (mid 2010 or newer), and Mac Pro (mid 2010 or newer).
Enable AirDrop on All Devices
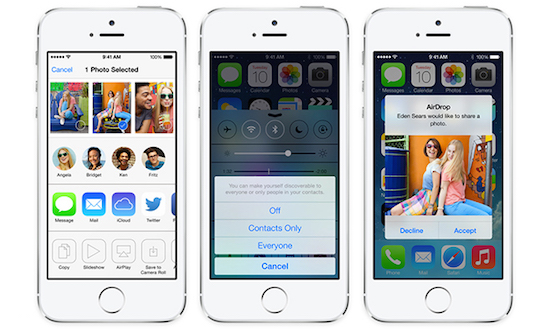
AirDrop is enabled by default on all Apple products running iOS 7 or later, and OS X Lion (10.7) or later. If for some reason the service has been turned off, it can be reactivated quickly and easily. On an iOS device, open the Control Center by swiping up on the screen. You’ll find an AirDrop button on the Control Center tray located right alongside the AirPlay button. Tap the AirDrop button to get a menu that allows you to turn the service off and on, and select who can send you files. Those options include “Contacts Only” and “Everyone.” Selecting the latter restricts AirDrop sharing to those who are entered into the Contacts app of your iOS device, while the former will allow anyone you meet to send you files. On a Mac, there is no easy way to disable AirDrop, so the service will always be active, even though it doesn’t broadcast itself on a network until you choose to use it.

AirDropping Files Mac-to-Mac
Sharing files between two Macs using AirDrop is simple. From the Finder, select the “Go” menu, and choose the option for AirDrop. (Alternatively use the shortcut command-shift-R) A new window will open that will show you icons representing any computers on the local network that are running a version of OS X that supports AirDrop. From there, it is simply a matter of dragging and dropping the files you want to share onto the icon that represents the user that you want to send the documents to. An alert will pop up on their computer indicating that someone is sending them files via AirDrop. They can choose to accept or reject those files. If they accept, the files will be quickly and transparently sent across the network, ending up in the “Downloads” folder.
AirDropping Files Between iOS Devices
To share files between iPhones, iPads, or compatible iPod Touches, the process is a little more involved, although not much so. In iOS 7 and 8, AirDrop can be found on the share sheets inside individual apps that support the service. So, for instance, if you want to share a photo, contact information, or a note, simply hit the share button within the appropriate app, and in addition to being able to share that item via Messages, Mail, Twitter, and Facebook, you’ll also see the ability to send it via AirDrop. All the devices within range that are AirDrop compatible will appear in a bar along the top of the share sheet, with an icon representing specific users. Tap the icon for the person you want to share the item with, and they will receive an alert informing them that you are sending them a file. When they accept, the file will automatically be stored within the appropriate app for that particular file type. Upon successful completion of the transaction, the person sending the file will also receive a confirmation alert.
AirDropping Files Between iOS Devices and a Mac
As noted previously, with the release of iOS 8 and OS X Yosemite, it is now possible to share files between devices running iOS and a Mac. The service functions exactly as detailed above, except Mac users now appear in the AirDrop menu on iOS, and vice versa. File transfers are seamless and incredibly easy, with documents going directly into the “Downloads” folder on the Mac, and appearing inside the appropriate app on iOS. Simply select the user you want to send the files to, and the two devices will do all of the rest. The process is quick, simple, and elegant.
Important Things to Remember
AirDrop is incredibly simple, and after you’ve used it a few times, you’ll wonder how you ever lived without it before. For instance, it is a great way to share a photo with friends, or send contact information to a colleague. But there are a couple of things to keep in mind as you use the service.
- In order for a device to appear as an AirDrop contact it must not be in sleep mode. Wake your iPhone, iPad, or Mac when you want to send or receive files.
- The files that can be shared using AirDrop include Safari, Maps, Notes, Pages, Keynote, Numbers, Contacts, Photos, iMovie, Garageband, iPhoto, and Photo Booth. On iOS Third party files can be shared using AirDrop too, provided app developers have included the functionality in their code. On Mac-to-Mac transfers, any type of file can be sent using the service.
- AirPort no longer require devices to be on the same network to function. All files are sent peer-to-peer, which makes this a handy way of sharing information – such as Maps directions – when a network of any kind is not available.
There you have it. The basics for using AirDrop between all of you Apple devices.


One thought on “How to Use AirDrop to Share Files Between iOS 8 and OS X Yosemite”
Binfer is a better way to transfer files between computers. It is so easy that it is unbelievable. See https://www.binfer.com/features/files-transfer-directly-from-computer-to-computer