

When your hard drive starts to fail, Disk Utility might not be powerful enough to save you. Instead, you might want to turn to one of the big guns: fsck. fsck, which stands for “File System Consistency Check,” is a command-line tool that reviews and repairs the underlying structure of a hard drive. If you’re wondering, it’s no coincidence that it looks like the thing you say when you hard drive fails. We all hope we never have to use it, but if you do, here’s a brief introduction into its functionality.
If you’re familiar with the fsck from Linux, you’ll notice a lot of similarities in the macOS version. This article is written with a focus on the Mac’s user interface. Uniquely, fsck needs to be run in single user mode to be even sort of useful, representation a significant limitation in comparison to the Linux version.
Finding the Right Disk
Before you can run fsck, you’ll need to find the device node and identifier of the disk you want to target. We’ll use Terminal’s diskutil command to accomplish that. If you can’t run Terminal from inside macOS, you can access the same data with /sbin/diskutil inside Single User mode.
1. Open Terminal (/Applications/Utilities/Terminal.app)
2. Type the following command, then press “Enter.” This will run the command line version of Disk Utility, which provides more data.
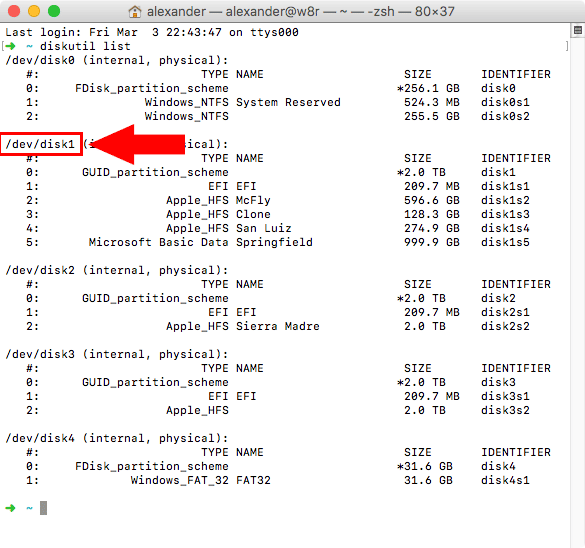
diskutil list

3. You’ll be given a list of all currently connected hard drives. This includes mounted and unmounted drive

4. Locate the disk you want to fsck and find its device identifier. It will look like /dev/disk1. You’ll find this information along the left margin of the Terminal window. Write this ID down: you’ll need it in the next steps.
Running fsck from Single User Mode
Because fsck can edit the core file system, macOS won’t let you run it from inside the operating system. You might think you can run fsck on a non-booting disk, but you’d be wrong. fsck is basically non-functional while in macOS’s userland. You’ll need to reboot into Single User mode, a text-only superuser interface for macOS. If you familiar with the basics of Terminal, you’ll recognize Single User mode.
1. Restart your computer.
2. Hold down “Command + S” while your computer restarts to enter Single User mode. You can release the keys once you see white text start to appear on the startup screen.
3. Some white text will scroll by quickly. When it stops, you’ll see a command prompt at the bottom of the screen that reads root#.

If the text stops scrolling but you don’t see this prompt, press the “Enter” key once to reveal it.
4. To repair the boot disk, type in the following command, then press “Enter.”
/sbin/fsck -fy

This runs fsck two flags:
-fforces it to check journaled file systems like HFS+-
-yautomatically says “yes” to any prompts thatfsckmight encounter.
The -y flag can be a little dangerous, so use it carefully. As fsck’s man page points out, “this should be used with great caution, as this is a free license to continue after essentially unlimited trouble has been encountered.” If you’re concerned about giving fsck free reign over your file system, you can leave it off and press the “y” key manually when prompted.
5. You can also use fsck to repair non-booting disks, but you’ll need to know the file system type. If you’re not sure about the file system, it’s probably HFS+. You can find out for sure with the diskutil command we ran earlier.
For example, if I wanted to run fsck on /dev/disk2, I might use the following command:
/sbin/fsck_hfs -fy /dev/disk2

That command runs the HFS version of fsck on the target drive. Other available file systems include fsck_msdos, which runs Windows’ FAT file systems; fsck_exfat, which examines ExFAT filesystems; and fsck_udf, which looks at UDF file systems.
4. fsck will check the file system and attempt to repair any damage that it finds. If it finds no damage, it will exit with “OK.”
5. When fsck is finished checking and repairing the filesystem, type reboot into the command prompt and press “Enter.”
When fsck Fails

fsck is powerful, but it can’t fix everything. If the utility can’t repair your disk, you’ll be told through a brief failure message. This is typically pretty short on detail, but it does tell you that you’ll need a more powerful solution.
You can use two programs to save your disk: DiskWarrior and Data Rescue. Data Rescue is geared towards recovering files from damaged hard drives, while DiskWarrior can also get corrupted drives running again. Both programs are expensive but capable.
In either case, you’ll need to connect the hard drive to a different Mac and run those applications from inside a functioning version of macOS. Because of file system incompatibilities, you can’t easily fix a Mac-formatted disk from within Windows.
Conclusion
fsck on the Mac isn’t as powerful as fsck on Linux, but it can still be a lifesaver if you end up with a corrupted boot disk or damaged hard drive.
You might also like:


6 thoughts on “Repair Hard Disks with fsck on macOS”
Hi
can i repair a damaged volum Header on externel Volum?
(Mac)
I can´t found something to repair it with fsck. Other software didn´t works.
Regards
Hi
can i repair a damaged volume Header on externel Volume?
(Mac)
I can´t found something to repair it with fsck. Other software didn´t works.
Regards
What’s wrong with my computer , the command s root: /sbin/ fsck-fy : no such file or directory.
Is it totally gone.
Ah, you’ve got the space in the wrong place! Precise spacing is extremely important on terminal commands like fsck. The correct spacing is below:
/sbin/fsck -fy
Make sure that the space is between fsck and -fy, not between /sbin/ and fsck.
I keep getting this message: “The volume could not be verified completely”
I have used :
/sbin/fsck_hfs -fy /dev/disk2s1
Any help would be much appreciated
Thank you
el capitan is now protecting permissions, even with your /usr/libexec/repair_packages –repair –standard-pkgs (thanks for it) it’s not more possible to repair permissions – the file systems to repair are read only – any hint ?