
Do you listen to music on your MacBook? Noticed that the sound just isn’t as crisp and clear as you’d like it to be? If you’re using the Apple Music app, the sound output can be adjusted thanks to its equalizer and the music would sound pretty okay. There are also several presets that you can use through the app. However, if you’re using Spotify or Safari (e.g. YouTube) to listen to music, it might be a bit challenging to get to make the sound coming out of your MacBook better. Safari doesn’t even have its own built-in equalizer. How are you going to fine-tune the bass or adjust the treble?
That’s where equalizer (EQ) apps come in really handy. There’s a number of EQ apps you can check out if you’re looking to improve the sound quality of your MacBook. One of the easiest ones to use and navigate is the eqMac. It’s a straightforward app that even beginners would be able to enjoy using from the get-go. This app is easy to download and quick to install even for newbies. Once you use this, you’ll immediately notice an improvement on your MacBook. The low-end will dissipate while the mids will have a slight boost.
Of course, there are other EQ apps you can look into like Boom, Airfoil, and Audio Hijack. However, these apps may be a bit complicated to use for people who aren’t advanced in adjusting the different sound controls. eqMac is not only easy to use, it’s also free! So if you’re interested in trying it out, here’s how to install eqMac on your MacBook:
- Open your browser and go to the eqMac website (https://eqmac.app).
- Download the app and open the .dmg file.
- You’ll see the eqMac app logo on a new window. Drag this icon into your Applications folder.
- Launch the eqMac app. You will be prompted to verify that you wish to continue opening this app for security reasons.
- The process will also prompt you to allow the installation of an audio driver. Select “OK.”
- Do note that the installation of this driver is at the system level. Hence, you will be required to enter an administrator name and password to proceed with the installation. Then, click “OK.”
- The app would then request access to your MacBook’s microphone. You might be worried for safety reasons but this is only needed for the routing of the audio and nothing else. The main focus of this is only the input for the system audio source, which is simply eqMac. Select “Proceed.”
- Once the prompt appears for microphone access, select “OK” and the installation process should be a success.
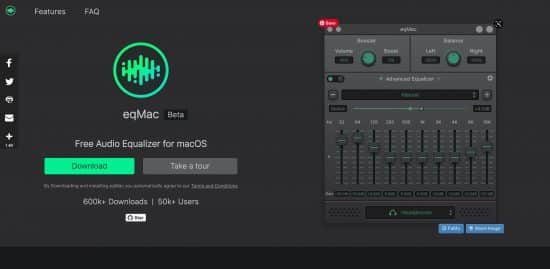
Now, how do you use the eqMac to make your MacBook sound better? When you open the app, you’ll see the default “Basic Equalizer” window. The EQ setting is initially at “Flat,” which just means that no EQ has been applied to your system yet. From here, you can make a number of simple tweaks like adjusting the Bass, Mid, and Treble according to your liking. You simply have to adjust the virtual knobs to either raise or lower your settings.
On the other hand, if you’re a bit advanced and quite specific with your desired sound output, you can also adjust the frequencies. The app also offers presets based on different music genres. You just have to click the arrow located on the right side of the title “Basic Equalizer” and you’ll see “Advanced Equalizer.” This will show you 10 bands of equalizer adjustments and you can happily adjust from there.
Not sure how to adjust properly to suit your taste? There’s an option for you to import presets. Just click on the gear or setting icon located on the right side of the title “Advanced Equalizer” and a list of settings will pop up. Select “Import Presets.” This will prompt the app to import different types of presets ranging from Dance and Acoustic to Rock and even Spoken Word. This just proves that the eqMac app is a great all-around equalizer not just for music but for all sounds.
Using the “Advanced Equalizer” is highly recommended in order to boost the overall gain of your MacBook. Have fun adjusting the settings until you find the right tune, clarity, and crispness that you’re looking for in your sound quality. The presets are also great for beginners who aren’t sure how to adjust their sound settings but still want better sound quality. The eqMac app is indeed an easy and incredibly useful tool for people who are quite specific with their sound quality. If you’re looking for an EQ app with many more features that you can tinker with, you can also check out the SoundSource.


One thought on “How to Make Your MacBook Sound Better”
Hello Ayran!! Thanks for sharing such outstanding content with us. I hope your article will help MacBook users in a better sound experience. Keep it up!!