
Quick actions in macOS Mojave allow users to quickly and easily access Automator workflows to process files in a repeatable ways. With these actions your Mac can automatically perform repetitive tasks with just two clicks.
In this tutorial we are going to show you how to create and use Quick Actions in macOS Mojave.
Opening Automator
Launch Automator from Spotlight or /Applications/Automator.app.
In the pop-up window click New Document to create a new workflow.
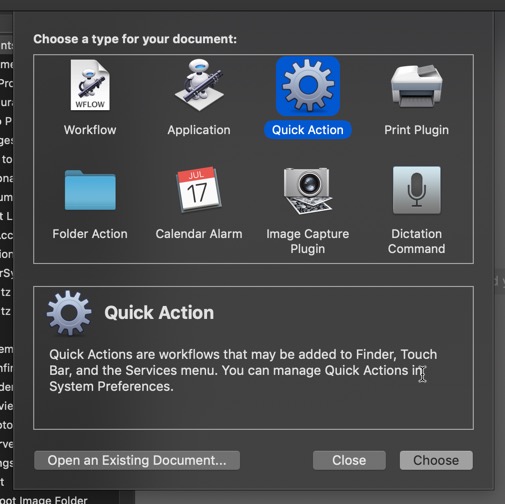
Choose Quick Action from the document type selection screen.
Building your Action
The pane on the left of Automator is made up of a list of actions. These actions can be combined to create chains of actions, producing complex workflows. In this example we’ll create a image resizing action, which is both simple enough for a novice user to understand and useful enough to have a real function.
The main Automator window includes the space that shows your workflow on the right (currently empty) and panels of actions on the left.
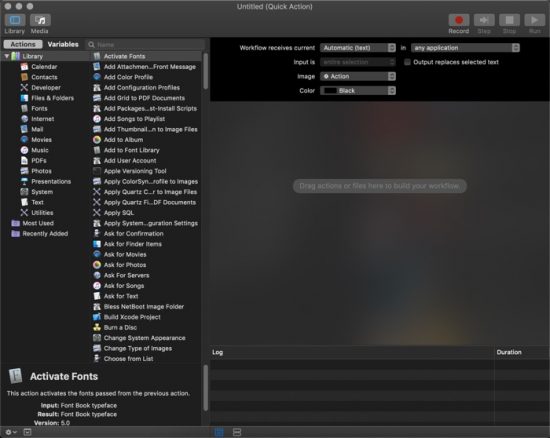
Double-clicking on actions or dragging the actions into the workflow pane will add the action to your workflow.
At the top of the window, you’ll select some options about what files your action works on and how it will appear within the Quick Actions menu.

Workflow receives current controls what files the workflow will operate on and the application the action will be available with.
Image sets the icon for Quick Action. It has no effect on function.
Color sets the color of the action within the menu. It also has no effect on function.
Building an Image Resizing Action
With our bearings set, we can begin adding actions to our empty workflow.
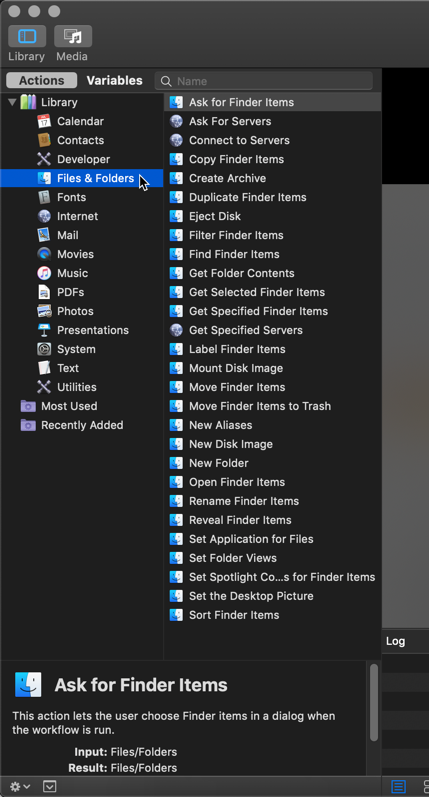
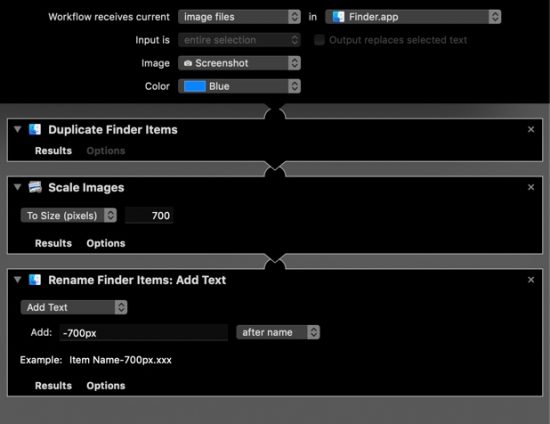
1. Select Files & Folders from the left-most pane. Double-click Duplicate Finder Items from the adjacent pane.
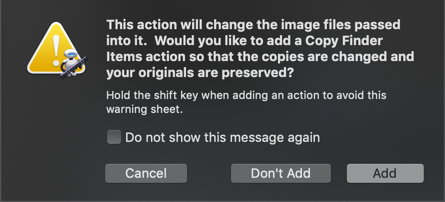
2. Select Photos and then double-click Scale Images. You’ll see a alert pop up, warning you that this will change the files. We’ve already duplicated the files, so that’s no concern for us. Click Don’t Add to avoid adding an unnecessary copying action.
Once the action is in place, Select To Size (pixels) from the dropdown and type in the desire pixel dimensions. Here we’ve used 700 pixels.

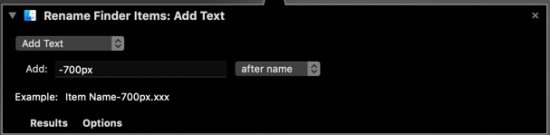
3. Select Files & Folders again, then double-click Rename Finder Items. Within this box select Add Text from the dropdown. In the Add dialog box, provide a suffix. This will be added at the end of the filename but before the extension. Here we’ve used “-700px” to indicate the file’s dimensions and avoid filename conflicts. You can see an example of what your image names will look like in the example at the bottom of the Rename pane.
The final assembled workflow will appear as shown below.
Saving Your Workflow
Once the workflow is constructed, we need to save it.
1. Select File > Save or press Command + S
2. Name the workflow as you’d like it to appear in Finder, with spacing and capitalization as desired.
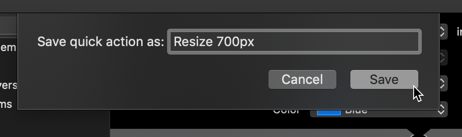
3. The action as named will be stored in ~/Library/Services. You can also reopen the action through the File > Open Recent… menu in Automator.
Using Your Workflow
Workflows are accessible from two primary places:
1. The Quick Actions menu in the Preview pane of Finder, indicated by the circle with three dots in it.
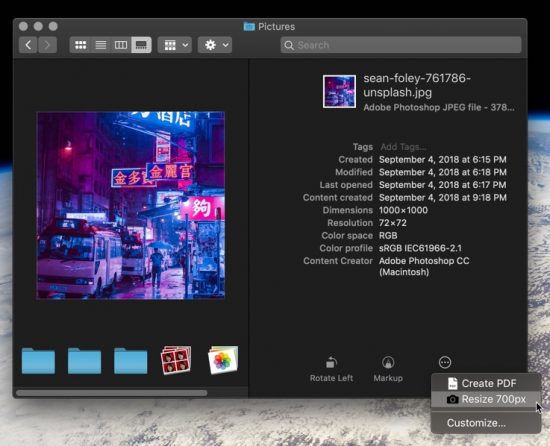
2. The “Quick Actions” section of the contextual menu. Right-click on an image and hover over “Quick Actions” to see the list of available actions. Then click the action to execute it.

Creating Other Actions
Your Mac includes more than one-hundred built-in actions, allowing you to quickly build productive, time-saving workflows in Automator. And since one of those actions is Apple Script, you can more or less create your own actions programmatically. If you can think it (and you don’t mind learning Apple Script), you can built it.
If you’re interested in automating your Mac, you might also like the following posts:


